Using Production Rates
Jump to the Exterior Area Calculator
Jump to the Interior Area Calculator
Performing an estimate using production rates
It is assumed that you have already adjusted or entered your production rates in the Production Rates form. More information can be found here.
To use production rates in your estimate, click the Production Rates button to bring up the input area.


Description of the different input fields
- Area: Main category of the rate (e.g. Stucco). Toggle between Exterior and Interior as needed.
- Rate: Lists all rates under the selected category. Preferred rates and materials load automatically.
- Qty: Quantity being estimated (for example, 2000 sq ft).
- UPH: Units Per Hour — how many units one painter can complete in one hour.
- Materials: Select finish materials. Only gallon or liter-based products appear.
- Coats: Number of coats. Additional coats typically take less time than the first.
- Level: Difficulty rating from 0 (easy) to 10 (hard).
- Total: Total cost for the rate. Click the sum button for details.
Adding our line item to the main grid
Before adding the rate, place it into a group for readability. For example, enter Body of the House in the Area field.

Click Add to insert the rate into the main estimate grid.

The grid now shows days, crew size, materials, and total cost.
Rounding your materials
Materials can be rounded to the nearest gallon, quart, or decimal for improved accuracy.

Adding more materials
To add primer or prep materials, click inside the Materials cell. A paint bucket icon will appear.


More information can be found in Using the Job Materials Form.
Editing and deleting line items
To edit a rate, on the main grid where your production rate is, you can right-click and select Edit or click the blue pencil icon at the end of the row.
If you manually edit values in the grid and later reopen the rate in the Production Rates editor, those changes will be lost.
To delete a rate, right-click and delete it or click the red X icon.
Using the Area Calculator
The Area Calculator allows you to estimate entire interior or exterior areas without adding each section line by line.
Required categories must exist and be spelled exactly as shown, with a default rate selected.
Exterior
- Siding
- Fascia Board
- Eaves
- Doors
- Windows
Interior
- Walls
- Ceilings
- Baseboards
- Crown Molding
- Doors
- Windows
Select Exterior or Interior using the toggle, then click the calculator button.

Using the Exterior Area Calculator

How we measure our main body and how we measure our gables
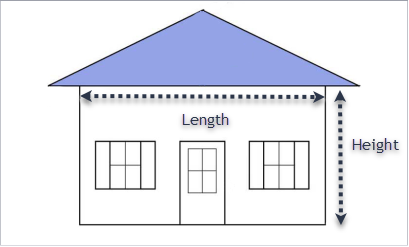

if you have more than one gable, enter the dimensions for only one gable in the dimensions area
From the Include / Exclude menu, select additional areas such as fascia and eaves.

For the Front of the House, we have a length of 25′ with a height of 10′. We have one gable that is 28′ in length and 10′ in height, and its body is stucco as well. The front of the house includes 1 door, 2 windows, fascia, and eaves.
This gives us the dimensions for the front of the house as follows:

When you add doors and windows, the square footage of these items is deducted from the total overall square footage. You can adjust this by clicking the Options button at the bottom of the form and entering 0 for both items.
Enter the number of Coats and the Level of Difficulty for each line item.
You are now ready to add this area to the main estimate grid.
Click the Accept & Continue button at the bottom of the form to add this area.

As shown above, with just a few measurements you can quickly add complete areas to the estimate.
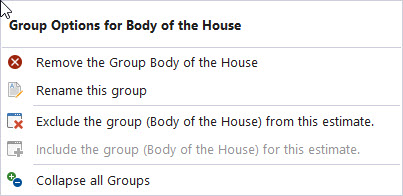
If you wish to edit this area, right-click on the group header (for example, where it says Front of the House). A menu will appear similar to the one shown below.

From this menu you can exclude the entire group, remove it, or edit it in the Area Calculator form.
If you make changes by manually entering data after the group has been added to the main grid, and later choose to edit the group using the Area Calculator, all manual changes will be lost.
Using the Interior Area Calculator
To use the Interior Area Calculator, switch to Interior using the toggle, then click the calculator button.
The Interior Area Calculator form will appear.

- Enter the room name or area by selecting it from the drop-down list, or by typing it directly.
- Enter the number of these rooms or areas in the quantity box. Most of the time this will not be needed, but it is useful when estimating multiple identical rooms such as offices or bedrooms.
- Enter the dimensions of the room or area by filling out the length, width, and height fields.
- Enter the number of doors and windows.
- From the Include / Exclude menu, select additional areas such as ceilings, baseboards, and crown molding.
- If you only want to include ceilings and not walls, check the option to exclude walls.
- The exclude windows and doors option is used when you want an accurate measurement of wall square footage. Enter the number of doors and windows, verify the average surface area values in Options (see below), and ensure both items are checked. The surface area for each door and window will be deducted from the wall area without estimating to paint them.
The Options setting allows you to define the average surface area for windows and doors. By default:
- Door: 21 sq ft (3′ × 7′)
- Window: 20 sq ft (4′ × 5′)
When doors and windows are added, their square footage is deducted from the total wall area. You can disable this by entering 0 for both items in the Options menu.

When you are ready to add the room or area to the main grid, click Accept & Continue.

As shown above, entering only a few measurements allows you to quickly add complete areas to the estimate.
To edit this area, right-click the group header (for example, Body of the House).
From this menu you can exclude the group, remove it, or edit it in the Area Calculator.
If you have any questions, please email support@thepaintestimator.com .