Expense Form
The Expense Form is where you enter all company expenses and income except for materials purchased for specific jobs. Job-related materials are entered on the Job Hours & Materials page.
Keeping this form up to date—even once a week—only takes a few minutes and provides valuable insight into where your money is going.
Do not use the Expense Form for materials purchased for a specific job. Those costs are entered through the Job Hours & Materials page and can be synced automatically.
What belongs in the Expense Form
Common expense and income items include:
- Taxes and insurance
- Office supplies and overhead costs
- Vehicle maintenance
- Tools and equipment
- Employee payroll
- Company income received
Job materials purchased for active estimates can be synced into this form manually or automatically when the form loads.
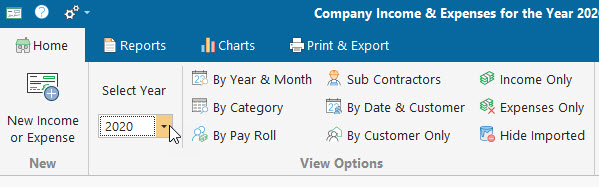
Opening the Expense Form
Open the Expense Form by clicking the checkmark icon at the top of the main window or from the side menu on the Start page.

Expense Form controls
- Backup & Sync — Perform individual backups or restores, and enable automatic syncing with job materials when the form loads.
- New Expense or Income — Add a new expense or income item.
- Sync Job Materials — Manually sync job materials purchased on active estimates.
- Grouping Options — Apply preset grouping methods.
- Locked Items — Items marked with a lock icon were generated from job materials and cannot be edited here.
- Reports & Charts — Access reports, charts, printing, and export options.
- Edit Column — Delete non–job-related expenses. Job materials must be removed from the estimate itself.
- Column Headers — Right-click to open the Column Chooser and show additional fields.
- Description Indicator — A red dot indicates an expense, and a green dot indicates income.
- Summary Total — Displays current income minus expenses.

Filtering expenses
Click any column header to display the filter icon. Filters allow you to narrow results by date, category, or year.
For example, to view expenses for the current year:
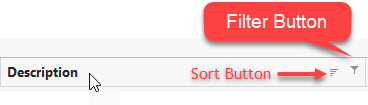
- Set Select Year to the current year or All - See above image
- Open the filter on the Date column - See above image
- Select This Year - See below image
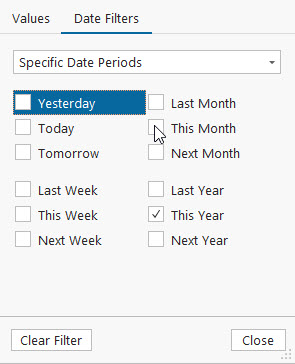
Click Close. The data in the main grid area should only show items that were entered this year
Adding a new expense or income item
Click New Expense or Income to open the entry panel.

- Select whether this is an expense or income
- Select the transaction date
- Select a vendor, employee, or customer
- Select a main category (income uses a fixed category)
- Select or create a subcategory
- Select a customer if job-related (optional)
- Enter a brief description
- Enter the amount and click Add
Reports
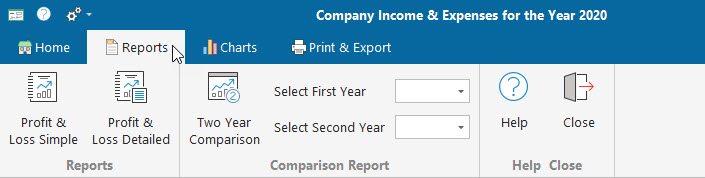
Available reports include:
- Profit & Loss (Simple)
- Profit & Loss (Detailed)
- Two-year comparison
Charts
Charts include Monthly and Yearly statistics. Monthly charts are based on the selected year at the top of the form.

Printing and exporting

Printing or exporting outputs the currently visible view. Printing from a chart exports the active chart.
If you have any questions, please contact support@thepaintestimator.com .